Kunekune Kitchen at BF Farm Kunekune Pigs
Applewood-Smoked Kunekune Pork Belly with Cherry-Balsamic Glaze and Herbed White Beans
June 2, 2026 · Kunekune Pork Recipes
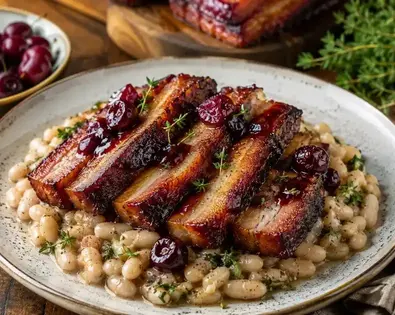
Applewood-Smoked Kunekune Pork Belly with Cherry-Balsamic Glaze and Herbed White Beans
Applewood-smoked Kunekune pork belly is the kind of dish that feels fancy without forgetting where it came from: a practical homestead cut, cooked slowly, handled with care, and served in a way that lets the pork shine. The belly is rich, tender, and deeply flavorful, while the cherry-balsamic glaze adds brightness and the herbed white beans turn the plate into a full, satisfying meal instead of just a showpiece slice of pork.
A Fancy Dish That Still Belongs in a Farm Kitchen
Some recipes try so hard to be elegant that they forget to be useful. This one does not. Pork belly is a real freezer cut. White beans are pantry-friendly. Applewood smoke is gentle enough for a special dinner but not so aggressive that it overwhelms the meat. Cherry and balsamic bring that glossy, restaurant-style finish while still feeling like something you could make from seasonal fruit, pantry vinegar, and a little patience.
This is a good recipe for:
- A special family dinner.
- A farm-to-table meal.
- A holiday or anniversary supper.
- A small dinner party.
- A "use the good cut" weekend meal.
- Showing new pork customers what a rich Kunekune cut can become.
- Learning how smoke, fat, acid, herbs, and beans work together.
Kunekune pork belly is naturally suited to this style of cooking because the cut rewards slow heat. The goal is not to rush it into a skillet and hope for crisp edges. The goal is to let the smoke season the fat, let the meat become tender, then finish it with a glaze that cuts through the richness.
Important Note: This Is Smoked Pork Belly, Not Bacon
Because this article sits in the Smoking & Curing category, it is worth being clear right away: this is a hot-smoked pork belly recipe, not a cured bacon recipe.
That matters.
This recipe does not use curing salts, pink curing salt, nitrites, long curing times, or a bacon-style preservation method. The pork belly is seasoned, smoked, cooked to tenderness, glazed, and served. Treat it like cooked fresh pork, not shelf-stable cured meat.
If you ever decide to cure pork belly for bacon, use a tested curing recipe from a reliable food-safety source and follow it exactly. Curing is not a "sprinkle some salt and guess" project. Salt percentage, curing salt type, meat thickness, time, refrigeration, and cooking all matter.
For this recipe, we are staying in safer beginner territory: fresh pork belly, cold storage, clean handling, controlled cooking temperature, and a thermometer.
Why Kunekune Pork Belly Works So Well Here
Kunekune pork can be beautifully flavorful, especially when the animal has been raised with attention to health, temperament, structure, pasture use, and long-term usefulness. In the kitchen, that often shows up as pork with real character: rich flavor, good fat, and a texture that rewards slower cooking.
Pork belly is a layered cut. It has meat, fat, and connective tissue all working together. Cook it too fast and the fat can feel heavy while the meat stays chewy. Cook it slowly and give it time, and the layers become tender, glossy, and deeply satisfying.
Applewood is a good smoke choice because it is mild, lightly sweet, and friendly to pork. Stronger woods can work, but pork belly already has richness. A heavy smoke can make the dish taste harsh. Applewood lets the Kunekune pork stay front and center.
The cherry-balsamic glaze works because pork belly needs balance. Fat loves acid. Smoke loves fruit. Rich meat loves a little sweetness, but not too much. The glaze should not taste like candy. It should taste deep, tangy, glossy, and just sweet enough to make you want the next bite.
Best Pork Belly Cut for This Recipe
Look for a pork belly slab with an even shape and a good balance of meat and fat. A little extra fat is not a problem with belly - that is the point of the cut - but you want enough meat in the layers to slice and serve nicely.
Good signs:
- Even thickness from end to end.
- Fresh, clean smell.
- Firm but not dry texture.
- Good fat-to-meat layering.
- Skin removed, unless you specifically want to manage skin separately.
- A size that fits your smoker without crowding.
A 2 1/2 to 4 pound piece is a nice size for a family-style special dinner. Smaller pieces cook faster and are easier to handle. Larger pieces can be beautiful, but they need more time and more careful temperature management.
Skin-On or Skin-Off?
For this recipe, skin-off pork belly is easier.
Skin-on belly can be wonderful in some recipes, especially when crisp crackling is the goal. But in a smoker, skin can become leathery if not handled properly. Since this dish is about tender smoked belly with a glossy glaze, skin-off keeps the process simpler and more dependable.
If your belly has skin on it, you can trim it off before seasoning, or save that skin for another use if you are comfortable working with it.
Equipment You Will Need
You do not need a professional setup, but a few tools make this recipe much easier.
Helpful equipment:
- Smoker, pellet grill, charcoal grill set up for indirect heat, or offset smoker.
- Applewood chips, chunks, or pellets.
- Instant-read thermometer.
- Probe thermometer if available.
- Sharp knife.
- Cutting board used only for raw meat prep.
- Small saucepan for glaze.
- Medium saucepan or Dutch oven for beans.
- Basting brush.
- Sheet pan or tray.
- Foil or butcher paper.
- Clean platter for cooked pork.
- Small bowl for seasoning mix.
- Fine grater or microplane for garlic or citrus zest, optional.
A thermometer is the quiet hero here. FoodSafety.gov lists pork steaks, roasts, and chops at a safe minimum internal temperature of 145 degrees F with a 3-minute rest, while leftovers should be reheated to 165 degrees F. Pork belly is usually cooked well beyond the safe minimum because the extra time and higher finishing temperature improve tenderness in this fatty cut. See FoodSafety.gov safe minimum internal temperature guidance at https://www.foodsafety.gov/food-safety-charts/safe-minimum-internal-temperatures.
Recipe Overview
This dish has three parts:
- The smoked pork belly: seasoned simply, smoked gently, then cooked until tender.
- The cherry-balsamic glaze: a tangy, glossy sauce brushed on near the end so it shines without burning.
- The herbed white beans: creamy, savory, and rustic enough to carry the richness of the pork.
The beans can be made while the pork smokes, or made a day ahead and reheated gently. The glaze can also be made ahead.
Timing Plan
This is not a rushed recipe, but it is manageable if you plan the day.
Same-Day Plan
Morning: Season pork belly and let it rest in the refrigerator for 2 to 4 hours.
Early afternoon: Start smoker and begin cooking pork belly.
Mid-cook: Make white beans and glaze.
Final hour: Brush pork with glaze and finish until tender.
Before serving: Rest pork, warm beans, slice, plate, and add a little extra glaze.
Easier Make-Ahead Plan
Day before: Season pork belly and refrigerate uncovered or lightly covered overnight.
Day before: Cook beans and refrigerate.
Day of serving: Smoke pork belly, make glaze, reheat beans, serve.
Overnight seasoning gives the salt time to work into the meat and helps the surface dry slightly, which can improve smoke flavor and browning.
Ingredients
For the Smoked Kunekune Pork Belly
- 1 piece Kunekune pork belly, about 2 1/2 to 4 pounds, skin removed.
- 2 teaspoons kosher salt.
- 1 teaspoon coarse black pepper.
- 1 teaspoon smoked paprika.
- 1/2 teaspoon garlic powder.
- 1/2 teaspoon onion powder.
- 1/2 teaspoon dried thyme.
- 1/4 teaspoon ground mustard.
- 1 tablespoon brown sugar, optional.
- 1 tablespoon apple cider vinegar.
- 1 tablespoon olive oil or rendered pork fat.
The brown sugar is optional because the glaze already brings sweetness. Use it if you like a slightly darker bark and a sweeter edge. Skip it if you want the pork to stay more savory.
For the Cherry-Balsamic Glaze
- 1 1/2 cups fresh or frozen dark cherries, pitted.
- 1/3 cup balsamic vinegar.
- 2 tablespoons honey or maple syrup.
- 1 tablespoon apple cider vinegar.
- 1 small shallot, finely minced.
- 1 small garlic clove, grated or finely minced.
- 1 teaspoon Dijon mustard.
- 1 small sprig fresh rosemary or thyme.
- Pinch of salt.
- Pinch of black pepper.
- 1 tablespoon butter, optional, for finishing.
Frozen cherries work very well here. Do not apologize for using them. A homestead kitchen is allowed to be practical.
For the Herbed White Beans
- 2 tablespoons olive oil or rendered pork fat.
- 1 small onion, finely diced.
- 2 carrots, finely diced.
- 1 celery rib, finely diced.
- 3 garlic cloves, minced.
- 3 cups cooked white beans, such as cannellini, navy, or great northern.
- 1 1/2 cups chicken stock, pork stock, ham broth, or bean cooking liquid.
- 1 bay leaf.
- 1 teaspoon fresh thyme leaves, or 1/2 teaspoon dried thyme.
- 1 teaspoon chopped fresh rosemary, optional.
- 1 tablespoon chopped parsley.
- 1 teaspoon lemon zest, optional.
- 1 to 2 teaspoons lemon juice or apple cider vinegar, to finish.
- Salt and black pepper, to taste.
Canned beans are fine. Rinse them gently before using. Home-cooked beans are excellent if you have them, especially if they were cooked with a ham hock, pork bone, or a little onion and bay.
Before You Start: Food Safety and Storage
Keep raw pork cold until you are ready to season or cook it. Use separate cutting boards, knives, and plates for raw pork and cooked pork, and wash hands and surfaces well after handling raw meat.
FoodSafety.gov's cold storage chart lists fresh pork roasts at 3 to 5 days in the refrigerator and 4 to 12 months in the freezer for best quality. Cooked meat leftovers are listed at 3 to 4 days in the refrigerator and 2 to 6 months in the freezer. See FoodSafety.gov cold storage guidance at https://www.foodsafety.gov/food-safety-charts/cold-food-storage-charts.
For this recipe, that means:
- Thaw frozen pork belly in the refrigerator, not on the counter.
- Keep seasoned pork refrigerated until smoking time.
- Put leftovers away promptly.
- Reheat leftovers to 165 degrees F.
- Do not treat this as preserved bacon or cured meat.
This is still farm cooking, but good farm cooking pays attention.
Step 1: Trim the Pork Belly
Place the pork belly on a clean cutting board. Pat it dry with paper towels.
Look for any loose edges, ragged flaps, or very thick uneven fat deposits. You do not need to trim it aggressively. Pork belly should be rich. Just clean up anything that will burn, dangle, or make slicing awkward later.
If one end is much thinner than the other, you can fold the thin end slightly under itself or simply know that it may cook faster. That thinner end often becomes the cook's sample. A noble sacrifice.
Step 2: Score the Fat Lightly
Use a sharp knife to score the fat side in a shallow crosshatch pattern. Do not cut deeply into the meat. You are not trying to cube the belly. You are just creating more surface area for seasoning, smoke, and glaze.
Aim for cuts about 1/4 inch deep.
Scoring helps:
- Seasoning cling to the surface.
- Fat render more evenly.
- Glaze settle into the top.
- Finished slices look more polished.
If the belly is already very thin, skip scoring or score very lightly.
Step 3: Season the Pork Belly
In a small bowl, mix the salt, pepper, smoked paprika, garlic powder, onion powder, thyme, ground mustard, and brown sugar if using.
Rub the pork belly with apple cider vinegar and olive oil or rendered pork fat. Then coat it evenly with the seasoning blend. Work the seasoning into the scored fat and along all sides.
Place the pork belly on a tray, fat side up. Refrigerate it for at least 2 hours, or overnight if you have time.
Do not leave it sitting at room temperature for hours. The rest happens in the refrigerator.
Step 4: Prepare the Smoker
Set your smoker for indirect cooking at 225 degrees F to 250 degrees F.
Applewood is the main smoke choice for this recipe. It gives a mild, slightly sweet smoke that works nicely with pork belly and cherry glaze.
Other wood options:
- Cherry wood: deeper fruit note and pretty color.
- Maple: gentle sweetness.
- Pecan: richer and nuttier.
- Oak: stronger, but still balanced if used lightly.
Avoid over-smoking. Pork belly's fat can hold smoke flavor very well. Too much smoke can make it taste bitter or heavy, especially when paired with balsamic glaze.
Let the smoker stabilize before adding the pork. A steady smoker is better than a dramatic one.
Step 5: Smoke the Pork Belly
Place the pork belly on the smoker, fat side up. Close the lid and let it cook gently.
For a 2 1/2 to 4 pound belly, begin checking tenderness around the 3-hour mark, though total time may run 4 to 6 hours depending on thickness, smoker temperature, and the individual cut.
You are watching for two things:
- Internal temperature.
- Tenderness.
Pork belly often becomes pleasingly tender around 190 degrees F to 205 degrees F, but do not rely on number alone. Slide a probe, skewer, or thermometer into the meat. It should go in with little resistance, especially through the meat layers. If it still feels tight or rubbery, it needs more time.
The safe minimum temperature chart gives you the floor for safe cooking; this recipe goes higher because pork belly tastes better when the fat and connective tissue have more time to soften.
Step 6: Make the Cherry-Balsamic Glaze
While the pork smokes, make the glaze.
In a small saucepan, combine:
- Cherries.
- Balsamic vinegar.
- Honey or maple syrup.
- Apple cider vinegar.
- Shallot.
- Garlic.
- Dijon mustard.
- Rosemary or thyme.
- Salt.
- Pepper.
Bring to a gentle simmer over medium heat. Reduce the heat and cook for 15 to 25 minutes, stirring occasionally, until the cherries soften and the mixture thickens.
Mash the cherries with a spoon as they cook. For a smoother glaze, blend it carefully with an immersion blender, or strain it through a fine mesh sieve. For a more rustic glaze, leave it slightly chunky.
Remove the herb sprig. Taste and adjust.
If it tastes too sharp, add a little more honey. If it tastes too sweet, add a splash of apple cider vinegar. If it tastes flat, add a pinch of salt. If it tastes heavy, add a little more mustard or vinegar.
Finish with butter if you want a glossy, rounder sauce.
Glaze Texture
The glaze should coat the back of a spoon, but it should not be as thick as jam. Remember that it will tighten as it cools. If it gets too thick, add a spoonful of water, stock, or apple cider vinegar and warm it gently.
Step 7: Make the Herbed White Beans
The beans are not just a side dish. They are the anchor. Pork belly is rich, and the beans give the plate comfort, structure, and a place for the glaze and pork juices to land.
In a medium saucepan or Dutch oven, warm olive oil or rendered pork fat over medium heat.
Add onion, carrot, and celery. Cook until softened, about 6 to 8 minutes. Add garlic and cook for another minute.
Add the beans, stock or bean liquid, bay leaf, thyme, and rosemary if using. Bring to a gentle simmer.
Cook for 20 to 30 minutes, stirring occasionally, until the beans are creamy and the liquid has thickened slightly. If they get too dry, add a splash more stock or water.
Season with salt and pepper. Finish with parsley, lemon zest, and a small splash of lemon juice or apple cider vinegar.
The finishing acid matters. It wakes the beans up and keeps the whole plate from feeling too rich.
Bean Texture
You want the beans creamy, not soupy and not dry. Mash a small spoonful of beans against the side of the pot and stir them back in if you want a thicker texture.
Step 8: Glaze the Pork Belly Near the End
Do not glaze too early. The sugar in the glaze can darken or burn if it sits over heat for too long.
When the pork belly is close to tender, brush a thin layer of cherry-balsamic glaze over the top and sides. Close the smoker and cook for another 15 to 20 minutes.
Brush on a second light layer if you want a deeper finish. Let it set for another 10 to 15 minutes.
You are looking for a glossy, lacquered surface, not a sticky burnt crust.
Save some glaze for serving. Do not reuse glaze that has touched raw or undercooked pork unless it is brought back to a proper boil. The easiest method is to pour a serving portion into a clean bowl before brushing the meat.
Step 9: Rest the Pork Belly
When the pork belly is tender, remove it from the smoker and place it on a clean tray or cutting board.
Rest for 15 to 25 minutes before slicing.
Resting helps the meat settle and makes slicing cleaner. If you cut immediately, the fat and juices may run all over the board instead of staying in the slice.
Tent loosely with foil if needed, but do not wrap it so tightly that the glaze steams off.
Step 10: Slice and Serve
Use a sharp knife and slice across the belly into thick slices, about 1/2 inch to 3/4 inch thick. For smaller servings, cut those slices into elegant squares or rectangles.
Spoon herbed white beans onto each plate. Lay pork belly slices over or beside the beans. Drizzle with a little warm cherry-balsamic glaze. Add parsley, thyme, cracked black pepper, or a small pinch of flaky salt if desired.
Serve with something fresh or bitter on the side.
Good pairings:
- Arugula salad with lemon.
- Charred green beans.
- Roasted carrots.
- Braised greens.
- Simple cabbage slaw.
- Pickled red onions.
- Grilled peaches.
- Crusty bread.
- Roasted squash in fall.
- Wilted kale with garlic.
This dish does not need five rich sides. Let the pork belly be the rich thing.
Plating It Fancy Without Making It Fussy
A few small moves can make this feel special:
- Use shallow bowls or wide plates.
- Put beans down first as the base.
- Slice pork belly cleanly and stack slightly off-center.
- Spoon glaze in a thin line instead of drowning the pork.
- Add one fresh herb garnish.
- Add something acidic or green on the side.
- Wipe the plate edge before serving.
There you go. Fancy. But nobody had to foam anything, thank heavens.
Doneness Cues for Pork Belly
A thermometer tells part of the story. Texture tells the rest.
Good signs:
- The probe slides in easily.
- Fat looks softened and glossy.
- Meat layers are tender.
- The belly bends slightly when lifted.
- Edges are browned but not dry.
- Glaze is shiny and set.
Signs it needs more time:
- Probe meets firm resistance.
- Meat layer feels chewy.
- Fat still feels rubbery.
- Slices are hard to cut.
- The center feels tight.
Signs it went too far:
- Edges are dry.
- Meat shreds instead of slices.
- Glaze tastes burnt.
- Fat has mostly rendered out and left the belly greasy but not juicy.
Pork belly is forgiving, but not invincible. Low heat and patient checking are your friends.
What If You Do Not Have a Smoker?
You can still make a very good version in the oven.
Oven Method
- Season the pork belly as directed.
- Place it on a rack over a rimmed baking sheet.
- Roast at 275 degrees F until tender.
- Brush with glaze near the end.
- Raise heat to 375 degrees F for a short final set if needed, watching carefully.
- Rest and slice.
You will not get the same smoke flavor, but the glaze, fat, and slow cooking will still make a beautiful dish.
To add a smoky note without a smoker, use smoked paprika in the rub and a tiny splash of smoked salt if you have it. Go lightly. Fake smoke flavor gets bossy fast.
What If You Want Crispier Edges?
For crispier edges, chill the smoked pork belly after cooking, then slice and sear portions in a cast-iron skillet.
This is a great make-ahead option.
Method:
- Smoke and glaze the pork belly.
- Cool it slightly.
- Refrigerate until firm.
- Slice into thick pieces.
- Sear in a hot cast-iron skillet until the edges crisp.
- Warm glaze separately and spoon over at serving.
This method gives you neater slices and more crisp texture. It is especially useful for dinner parties because you can do the long smoking step earlier.
Make-Ahead Options
Make the Glaze Ahead
The cherry-balsamic glaze can be made 2 to 3 days ahead and refrigerated. Reheat gently before brushing or serving.
Make the Beans Ahead
The beans are excellent made ahead. In fact, they often taste better the next day. Reheat gently with a splash of stock or water.
Smoke the Pork Ahead
You can smoke the pork belly a day ahead, chill it, slice it, and reheat by searing or warming gently in a low oven. If reheating leftovers, FoodSafety.gov lists leftovers at 165 degrees F for safe reheating.
Storage and Leftovers
Store leftover pork belly and beans in separate airtight containers when possible. The pork keeps its texture better that way.
Use refrigerated cooked meat within 3 to 4 days, or freeze it for longer storage. FoodSafety.gov lists cooked meat or poultry leftovers at 3 to 4 days in the refrigerator and 2 to 6 months in the freezer for best quality.
Best Leftover Ideas
Leftover smoked pork belly is gold.
Try it in:
- Breakfast hash with potatoes and eggs.
- White bean soup.
- Pork belly grilled cheese.
- Fried rice.
- Ramen bowls.
- Warm salad with bitter greens.
- Tacos with pickled onions.
- Beans and greens.
- Cornbread skillet supper.
- Small appetizer bites with extra glaze.
For leftovers, a little goes a long way. Pork belly is rich. You do not need a giant portion to make a meal taste special.
Freezer Notes
Cooked pork belly can be frozen, but the texture is best if you portion it first.
Good freezer method:
- Cool completely.
- Slice into meal-sized portions.
- Wrap tightly.
- Place in freezer bags or vacuum-seal.
- Label with name and date.
- Freeze flat when possible.
Freeze glaze separately in a small container or ice cube tray. Beans can also be frozen, though they may soften more when reheated.
When reheating frozen pork belly, thaw in the refrigerator, then warm gently. For best texture, sear slices in a skillet after thawing.
Common Mistakes to Avoid
Glazing Too Early
A sweet glaze can burn. Wait until the pork belly is close to tender before brushing it on.
Cooking Only to the Safe Minimum and Stopping There
The safe minimum temperature is important, but pork belly usually needs more time for texture. If you stop at 145 degrees F, it may be safe, but it will likely be chewy and fatty rather than tender. For belly, cook until the probe slides in easily.
Using Too Much Smoke
Pork belly absorbs smoke well. Heavy smoke can make the fat taste bitter. Use mild wood and steady heat.
Slicing Without Resting
Resting gives cleaner slices and better texture. Do not skip it just because the kitchen smells incredible.
Making the Glaze Too Sweet
The glaze should balance the pork, not turn it into dessert. Use vinegar, mustard, and salt to keep it bright.
Forgetting the Side Dish Needs Acid
White beans are creamy and comforting, but they need a little lemon juice or vinegar at the end. That tiny splash makes the whole plate better.
Treating This Like Bacon
This is not cured bacon. Store it and handle it like cooked fresh pork.
Flavor Variations
Blackberry-Balsamic Glaze
Swap cherries for blackberries. Strain the seeds if desired.
Peach-Bourbon Glaze
Use diced peaches, a splash of bourbon, cider vinegar, and a little maple syrup. Simmer well.
Fig and Red Wine Glaze
Use fig preserves, red wine vinegar, thyme, and black pepper for a deeper fall version.
Maple-Mustard Glaze
Skip cherries and use maple syrup, Dijon mustard, apple cider vinegar, garlic, and rosemary.
Savory Herb Belly
Skip the fruit glaze and finish with garlic, rosemary, thyme, lemon zest, and a splash of vinegar.
What to Serve With This for Different Seasons
Summer
Serve with grilled peaches, arugula salad, cucumber salad, or charred green beans.
Fall
Serve with roasted squash, braised greens, apples, or cornbread.
Winter
Serve with creamy beans, cabbage, roasted root vegetables, or a warm lentil salad.
Spring
Serve with peas, asparagus, tender greens, or lemony herbs.
This is one of those recipes that can move through the year just by changing the side dishes.
How This Fits Whole-Hog Homestead Cooking
One of the most useful things a family can learn when raising or buying pork is how to enjoy different cuts for what they are. Not every cut is a pork chop. Not every cut should be rushed. Belly, shoulder, hocks, bones, trim, roasts, chops, and ribs all have different jobs in the kitchen.
Pork belly is a rich cut, so it is best treated with intention. You can make bacon from it, cube it for burnt-end style bites, braise it, roast it, cure it properly with tested methods, or smoke it fresh like this recipe. The point is to use it well.
That is part of the bigger BF Farm Kunekune Pigs philosophy too: good kitchen results start before the kitchen. They start with thoughtful breeding, manageable animals, good structure, useful pork traits, and a clear plan for how the animal fits a real homestead.
A special meal like this is not just about being fancy. It is about respecting the cut.
Simple Dinner Menu
Here is an easy full menu around this pork belly:
Main: Applewood-smoked Kunekune pork belly with cherry-balsamic glaze.
Side: Herbed white beans.
Green: Arugula salad with lemon and shaved parmesan.
Bread: Crusty sourdough or skillet cornbread.
Drink: Sparkling cider, dry red wine, unsweet tea, or lemonade.
Dessert: Peach cobbler, cherry crisp, or vanilla custard.
That menu feels polished but still farm-kitchen friendly.
Recipe Card Summary
Applewood-Smoked Kunekune Pork Belly with Cherry-Balsamic Glaze
Cook time: 4 to 6 hours.
Prep time: 30 minutes, plus seasoning rest.
Serves: 6 to 8 as a rich main dish.
Wood: Applewood.
Smoker temperature: 225 degrees F to 250 degrees F.
Finish cue: Tender when probed, often around 190 degrees F to 205 degrees F internal.
Basic Steps
- Pat pork belly dry.
- Score fat lightly.
- Season with salt, pepper, paprika, garlic, onion, thyme, mustard, and optional brown sugar.
- Refrigerate at least 2 hours or overnight.
- Smoke at 225 degrees F to 250 degrees F with applewood.
- Simmer cherry-balsamic glaze.
- Cook herbed white beans.
- Brush pork with glaze near the end of cooking.
- Rest 15 to 25 minutes.
- Slice and serve over beans with extra glaze.
Final Thoughts
Applewood-smoked Kunekune pork belly with cherry-balsamic glaze is a special meal, but it is not out of reach. It asks for patience, a steady smoker, a good thermometer, and enough restraint to let the pork be the star. The white beans keep the plate grounded, the glaze brings brightness, and the smoke gives the dish that slow-cooked homestead depth that makes pork belly worth saving for the right meal.
This is the kind of recipe that turns a freezer cut into a memory. It is rich, practical, beautiful on the plate, and deeply tied to the idea that when you raise or buy good pork, you should cook it with care.